
How to Host Images on Sub-Domain in WordPress for Better Loading Time ?
Why we need to host all images on Sub-Domain ?
- Whenever we upload image to image gallery , It is by default uploaded in the upload folder at following path -
1 | <span style="color: #e34adc">http:</span><span style="color: #595979">//</span><span style="color: #5555dd">www.xyz.com/wp-content/uploads</span> |
- Browser can send 7-8 requests at time to different domains. So if we host all our images on same host then time require to load all images will be more as browser will get images one by one.
- If we host images on the sub-domain then images will be ideally at different location , and browser can send simultaneous http request to get images as well as content.
Steps to Host/Serve Images from Sub-Domain :
Firstly make sure that you are going to host all images on your sub-domain to improve site loading time.There are much more complications while doing this. But don’t worry we have written this article to solve your problem.
We are going to consider following two cases -
- WordPress is installed on Web Host where you have hosted Single site.
- WordPress is installed on Directory
- WordPress is installed on Web Host where you have hosted multiple sites.
Steps to Host Images on Sub-Domain :
1. Creating Sub-Domain
Log in to your Web-Hosts CPanel, Scroll down and look for Sub-Domains under Domains and click on it.

Enter a name for the sub-domain i.e img.example.com, give the path of the uploads folder.

Document root path will be different for Different WordPress Installation location
| WordPress Installation Location | Document Root |
|---|---|
| /public_html/wp-content/uploads | /public_html/wp-content/uploads |
| /public_html/xyz.com/wp-content/uploads | /public_html/xyz.com/wp-content/uploads |
| /public_html/blog/wp-content/uploads | /public_html/blog/wp-content/uploads |
| /public_html/xyz.com/blog/wp-content/uploads | /public_html/xyz.com/blog/wp-content/uploads |
2. Changing the Media Upload Folder
Now You have to log on to WordPress Blog. Go to Settings -> Media and enter the sub-domain in the Full URL path to files with http in the beginning and no trailing slash (/) in the end. Click on save changes.

3. Updating URL from Older Posts
 We have set up Environment for New images but older posts are still referring the older path so we have to change the image URL’s to the newer one.Launch phpmyadmin menu.
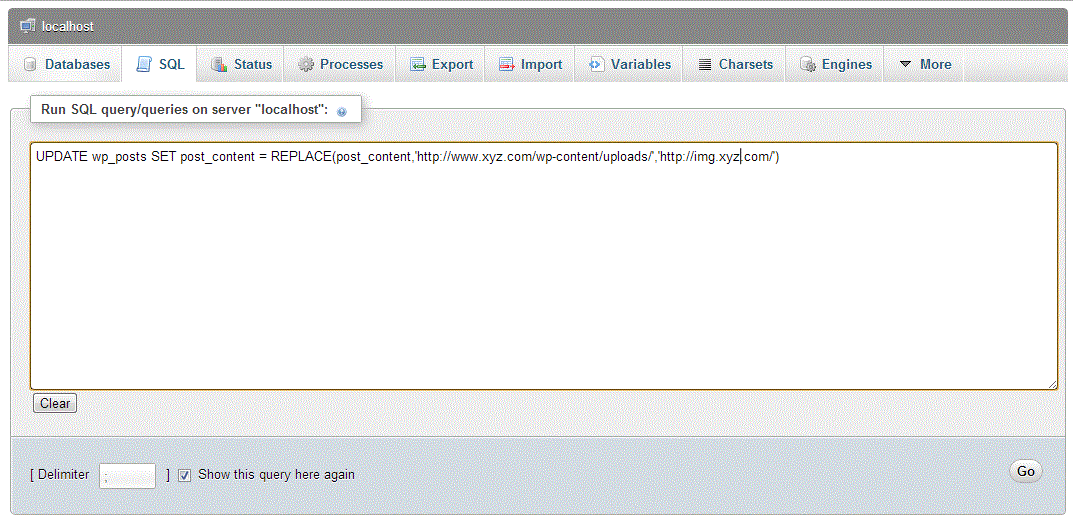
1 2 3 4 5 6 | UPDATE wp<span style='color:#308080'>_</span>posts SET post<span style='color:#308080'>_</span>content <span style='color:#308080'>=</span> REPLACE <span style='color:#308080'>(</span> post<span style='color:#308080'>_</span>content<span style='color:#308080'>,</span> <span style='color:#800000'>'</span><span style='color:#1060b6'>http://www.xyz.com/wp-content/uploads/</span><span style='color:#800000'>'</span><span style='color:#308080'>,</span> <span style='color:#800000'>'</span><span style='color:#1060b6'>http://img.xyz.com/</span><span style='color:#800000'>'</span> <span style='color:#308080'>)</span> |
4. Redirecting Older Links to Newer Links
If Some of your images are highly ranked in the google then we don’t want to loose our previous visitors just because of 404 Error so write following code in .htaccess file.
1 | RedirectMatch <span style='color:#008c00'>301</span> <span style='color:#308080'>^</span><span style='color:#308080'>/</span>wp<span style='color:#308080'>-</span>content<span style='color:#308080'>/</span>uploads<span style='color:#308080'>/</span><span style='color:#308080'>(</span><span style='color:#308080'>.</span><span style='color:#308080'>*</span><span style='color:#308080'>)</span>$ <span style='color:#5555dd'>http://img.xyz.com/</span>$<span style='color:#008c00'>1</span> |
1 | Note : *Don't Forgot to replace xyz with your domain. |