C++ Logical Operator

In this tutorial we will study C++ logical operator in detail. C++ logical operators are used mostly inside the condition statement such as if,if…else where we want multiple conditions.

C++ Logical Operator

  1. Logical Operators are used if we want to compare more than one condition.
  2. Depending upon the requirement, proper logical operator is used.
  3. Following table shows us the different C++ operators available.
Operators Name of the Operator Type
&& AND Operator Binary
|| OR Operator Binary
! NOT Operator Unary

According to names of the Logical Operators, the condition satisfied in following situation and expected outputs are given

Operator Output
AND Output is 1 only when conditions on both sides of Operator become True
OR Output is 0 only when conditions on both sides of Operator become False
NOT It gives inverted Output

Let us look at all logical operators with example-

C++ Program : Logical Operator

#include<iostream>
using namespace std;
int main()
{
   int num1=30;
   int num2=40;
   if(num1>=40 || num2>=40)
      cout<<"OR If Block Gets Executed"<<endl;
   if(num1>=20 && num2>=20)
      cout<<"AND If Block Gets Executed"<<endl;
   if(!(num1>=40))
      cout<<"NOT If Block Gets Executed"<<endl;
   return 0;
}

Output:

OR If Block Gets Executed
AND If Block Gets Executed
NOT If Block Gets Executed

Explanation of the Program

Or statement gives output = 1 when any of the two condition is satisfied.

if(num1>40 || num2>=40)

Here in above program , num2=40. So one of the two conditions is satisfied. So statement is executed.

For AND operator, output is 1 only when both conditions are satisfied.

if(num1>=20 && num2>=20)

Thus in above program, both the conditions are True so if block gets executed.

Truth table

Operator 1st Condition 2nd Condition Output
AND True True True
True False False
False True False
False False False
OR True True True
True False True
False True True
False False False
NOT True - False
False - True

C++ Relational Operators

C++ Relational operators specify the relation between two variables by comparing them. There are 5 relational operators in C

C++ Relational Operators

In C++ Programming, the values stored in two variables can be compared using following operators and relation between them can be determined.

Various C++ relational operators available are-

Operator, Meaning
> ,Greater than
>= , Greater than or equal to
== , Is equal to
!= , Is not equal to
< , Less than or equal to <= , Less than [/table]

Relational Operator Programs

Program #1: Relational Operator Comparison

As we discussed earlier, C++ Relational Operators are used to compare values of two variables. Here in example we used the operators in if statement.

Now if the result after comparison of two variables is True, then if statement returns value 1.

And if the result after comparison of two variables is False, then if statement returns value 0.

#include<iostream>
using namespace std;
int main()
{
   int a=10,b=20,c=10;
   if(a>b)
      cout<<"a is greater"<<endl;
   if(a<b)
      cout<<"a is smaller"<<endl;
   if(a<=c)
      cout<<"a is less than/equal to c"<<endl;
   if(a>=c)
      cout<<"a is less than/equal to c"<<endl;
   return 0;
}

Output

a is smaller 
a is less than/equal to c
a is greater than/equal to c

Program #2: Relational Operator Equality

In C++ Relational operators, two operators that is == (Is Equal to) and != (is Not Equal To), are used to check whether the two variables to be compared are equal or not.

Let us take one example which demonstrate this two operators.

#include<iostream>
using namespace std;
int main()
{
   int num1 = 30;
   int num2 = 40;
   int num3 = 40;
   if(num1!=num2)
      cout<<"num1 Is Not Equal To num2"<<endl;
   if(num2==num3)
      cout<<"num2 Is Equal To num3"<<endl;
   return(0);
}

Output

num1 Is Not Equal To num2
num2 Is Equal To num3

C++ Constructor basic concept

In this tutorial we will learnt about C++ constructor basic concept. Tutorial explains you everything about constructor in C++ in easier language.

C++ Constructor basic concept

  1. C++ constructors are the special member function of the class which are used to initialize the objects of that class
  2. The constructor of class is automatically called immediately after the creation of the object.
  3. Name of the constructor should be exactly same as that of name of the class.
  4. C++ constructor is called only once in a lifetime of object when object is created.
  5. C++ constructors can be overloaded
  6. C++ constructors does not return any value so constructor have no return type.
  7. C++ constructor does not return even void as return type.

C++ Constructor Types

  1. Default Constructor
  2. Parametrized Constructor
  3. Copy Constructor

We will discuss different C++ constructor types in detail -

C++ Constructor Types #1 : Default Constructor

  1. If the programmer does not specify the constructor in the program then compiler provides the default constructor.
  2. In C++ we can overload the default compiler generated constructor
  3. In both cases (user created default constructor or default constructor generated by compiler), the default constructor is always parameterless.

Syntax

class_name() {
-----
-----
}

Example of Default Constructor

Let us take the example of class Marks which contains the marks of two subjects Maths and Science.

#include<iostream>
using namespace std;
class Marks
{
public:
   int maths;
   int science;
   //Default Constructor
   Marks() {
      maths=0;
      science=0;
   }
   display() {
      cout << "Maths :  " << maths <<endl;
      cout << "Science :" << science << endl;
   }
};
int main() {
  //invoke Default Constructor
  Marks m;
  m.display();
  return 0;
}

Output :

Maths :  0
Science : 0

C++ Constructor Types #2 : Parametrized Constructor

This type of constructor can take the parameters.

Syntax

class_name(Argument_List) {
-----
-----
}

Example of Parametrized Constructor

Let us take the example of class ‘Marks’ which contains the marks of two subjects Maths and Science.

#include<iostream>
using namespace std;
class Marks
{
public:
   int maths;
   int science;
   //Parametrized Constructor
   Marks(int mark1,int mark2) {
      maths = mark1;
      science = mark2;
   }
   display() {
      cout << "Maths :  " << maths <<endl;
      cout << "Science :" << science << endl;
   }
};
int main() {
  //invoke Parametrized Constructor
  Marks m(90,85);
  m.display();
  return 0;
}

Output

Maths :  90
Science : 85

C++ Constructor Types #3 : Copy Constructor

  1. All member values of one object can be assigned to the other object using copy constructor.
  2. For copying the object values, both objects must belong to same class.

Syntax

class_Name (const class_Name &obj) {
   // body of constructor 
}

Example of Copy Constructor

Let us take the example of class ‘Marks’ which contains the marks of two subjects Maths and Science.

#include<iostream>
using namespace std;
class marks
{
public:
    int maths;
    int science;
    //Default Constructor
    marks(){
      maths=0;
      science=0;
    }
    //Copy Constructor
    marks(const marks &obj){
      maths=obj.maths;
      science=obj.science;
    }
    display(){
      cout<<"Maths :   " << maths
      cout<<"Science : " << science;
    }
};
int main(){
    marks m1;
    /*default constructor gets called 
         for initialization of m1  */      
    marks m2(const marks &m1);
    //invoke Copy Constructor
    m2.display();
    return 0;
}

Output

Maths :  0
Science : 0

C++ Overloading assignment operator

We already know the assignment operator in C++. In this tutorial we will be learning concept of C++ Overloading assignment operator.

Assignment operator in C++

  1. Assignment Operator is Used to assign value to an variable.
  2. Assignment operator is denoted by equal to sign.
  3. Assignment operator have Two values L-Value and R-value. Operator copies R-Value into L-Value.
  4. It is a binary operator.

C++ Overloading Assignment Operator

  1. C++ Overloading assignment operator can be done in object oriented programming.
  2. By overloading assignment operator, all values of one object (i.e instance variables) can be copied to another object.
  3. Assignment operator must be overloaded by a non-static member function only.
  4. If the overloading function for the assignment operator is not written in the class, the compiler generates the function to overload the assignment operator.

Syntax

Return_Type operator = (const Class_Name &)

Way of overloading Assignment Operator

#include<iostream>
using namespace std;
class Marks
{
   private:
      int m1;            
      int m2;           
   public:
   //Default constructor
   Marks() {
        m1 = 0;
        m2 = 0;
   }
   // Parametrised constructor
    Marks(int i, int j) {
        m1 = i;
        m2 = j;
    }
   // Overloading of Assignment Operator
    void operator=(const Marks &M ) { 
        m1 = M.m1;
        m2 = M.m2;
    }
   void Display() {
      cout << "Marks in 1st Subject:" << m1;
      cout << "Marks in 2nd Subject:" << m2;
    }   
};
int main()
{
  // Make two objects of class Marks
   Marks Mark1(45, 89);
   Marks Mark2(36, 59); 
   cout << " Marks of first student : "; 
   Mark1.Display();
   cout << " Marks of Second student :"; 
   Mark2.Display();
   // use assignment operator
   Mark1 = Mark2;
   cout << " Mark in 1st Subject :"; 
   Mark1.Display();
   return 0;
}

Explanation

 private:
      int m1;            
      int m2;  

Here, in Class Marks contains private Data Members m1 and m2.

Marks Mark1(45, 89);
Marks Mark2(36, 59);

In the main function, we have made two objects ‘Mark1’ and ‘Mark2’ of class ‘Marks’. We have initialized values of two objects using parametrised constructor.

void operator=(const Marks &M; ) { 
	m1 = M.m1;
	m2 = M.m2;
}

As shown in above code, we overload the assignment operator, Therefore, ‘Mark1=Mark2’ from main function will copy content of object ‘Mark2’ into ‘Mark1’.

Output

Marks of first student : 
Mark in 1st Subject : 45 
Marks in 2nd Subject : 89
Marks of Second student : 
Mark in 1st Subject : 36 
Marks in 2nd Subject : 59
Marks of First student : 
Mark in 1st Subject : 36 
Marks in 2nd Subject : 59

AngularJS with HTML DOM

In AngularJS it is possible to bind application data to an attribute of HTML DOM element.

AngularJS with HTML DOM

No.NameDescription
1ng-disabledIt is used to disable a given control
2ng-showIt is used to show a given control.
3ng-hideIt is used to hide a given control.
4ng-clickIt is used to represent an AngularJS click event.

AngularJS HTML DOM : Example

<!DOCTYPE html>
<html>
<head>
<script src="angular.min.js"></script>
</head>
<body>
<div ng-app="" ng-controller="controller1">
<p>Toggle check buttons to check the status..</p>
<table border="1">
   <tr>
      <td>Disable Button</td>
      <td>Show Button</td>
      <td>Hide Button</td>
   </tr>
   <tr>
      <td><input type="checkbox" ng-model="isChecked1"></td>
      <td><input type="checkbox" ng-model="isChecked2"></td>
      <td><input type="checkbox" ng-model="isChecked3"></td>
   </tr>
   <tr>
      <td><button ng-disabled="isChecked1">Disable</button></td>
      <td><button ng-show="isChecked2">Show</button></td>
      <td><button ng-hide="isChecked3">Hide</button></td>
   </tr>
   <tr>
      <td>{{isChecked1}}</td>
      <td>{{isChecked2}}</td>
      <td>{{isChecked3}}</td>
   </tr>
</table>
</div>
<script>
function controller1($scope) {
   $scope.isChecked1 = true;
   $scope.isChecked2 = true;
   $scope.isChecked3 = true;
}
</script>
</body>
</html>

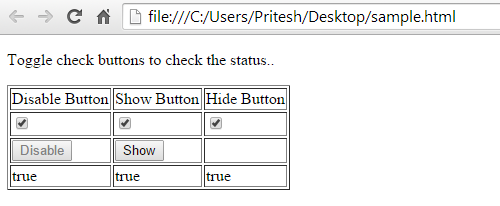
Output :
AngularJS HTML DOM

Explanation

In the AngularJS we can manage the attribute of an element using the AngularJS directives.

ng-disabled directive

Consider the below code of the button control in HTML -

<button ng-disabled="isChecked1">Disable</button>

In this case ng-disabled attribute will decide whether to disable the control or not depending on the value of isChecked1 variable

We can toggle the value of the isChecked1 on the basis of checkbx check value. Using ng-model directive we can bind the value to variable

<input type="checkbox" ng-model="isChecked1">

ng-show directive

The ng-show directive shows or hides the given HTML element based on the expression provided to the ng-show attribute

ng-hide directive

Add ng-hide attribute to a HTML button and pass it a model. Bind the model to an checkbox and see the variation.

ng-click directive

Add ng-click attribute to a HTML button and update a model. Bind the model to html and see the variation.

C++ Inheritance basics

In this chapter we will be learning about C++ Inheritance basics. Tutorial explains you different types of inheritance in C++ programming language.

Basics of inheritance

Inheritance is one of the basic features of object oriented programming. In the process of inheritance, one object can acquire the properties of another class.

Type of classDefinition
Base ClassA class that is inherited is called a base class. In below diagram, the class 'vehicle' is a base class.
Derived ClassThe class that does the inheriting is called a derived class. In below diagram, the class 'car' is a derived class.

C++ Inheritance Basics

Explanation

  1. In the above picture, it is clearly mentioned that we are having two classes i.e base and derived class.
  2. Base class contains general information about the specific entity
  3. Derived class contains more specific information related to the one of the type which is inherited from the base class.
  4. In above example vehicle class will contain general information about all vehicles but derived class car contains all the information of the class vehicle along with car specific information.

Types of Inheritance

According to the way of inheriting the properties of base class, there are certain forms of inheritance.

Types of inheritance

Inheritance Type #1 : Single Inheritance

In this type of inheritance, one Derived class is formed by acquiring the properties of one Base class.

Cplusplus Simple Inheritance

Class NameTypeExplanation
ABase classIt is base class in the above program
BDerived classClass derives the properties of class A

Inheritance Type #2 : Multiple Inheritance

In this type of inheritance, one Derived class is formed by acquiring the properties of multiple Base classes

Cplusplus Multiple Inheritance

Class NameTypeExplanation
ABase classIt is base class in the above program
BBase classIt is base class in the above program
CDerived classClass derives the properties of class A and B

Inheritance Type #3 : Hierarchical Inheritance

In this type of inheritance, multiple subclass are formed by acquiring the properties of one Base class.

Cplusplus Hierarchical Inheritance

Class NameTypeExplanation
ABase classIt is base class in the above program
BDerived classClass derives the properties of class A
CDerived classClass derives the properties of class A
DDerived classClass derives the properties of class A

Inheritance Type #4 : Multilevel Inheritance

In this type of inheritance, derived class is formed by acquiring the properties of one base class.

Again same derived class is used as a base class and another class is derived from this.

Cplusplus Multilevel Inheritance

Class NameTypeExplanation
ABase classIt is base class in the above program
BBase class for C and derived class for A-
CDerived classIt contains all the properties of class A and B so we can consider this as derived class of A also

Inheritance Type #5 : Hybrid Inheritance

In this type of Inheritance, the Derived class is formed by any legal combination of above four forms.

hybrid inheritance

AngularJS Tables

In the previous chapter we have learnt about the AngularJS controllers and in this chapter we will be learning about AngularJS filters.

AngularJS Tables

ng-repeatdirective is used to repeat the elements from array and to display elements of array in HTML tables

<tr ng-repeat="student in students">
   <td>{{ student.name  }}</td>
   <td>{{ student.marks }}</td>
</tr>

below are meaning of some of the elements -

VariableExplanation
studentsName of array
studentArray element used in each iteration
student.nameAccess name of student from array element
student.marksAccess marks of student from array element

AngularJS Tables : Examples

AngularJS Tables #1 : Simple Table Example

<!DOCTYPE html>
<html>
<head>
<script src="angular.min.js"></script>
</head>
<body>
<div ng-app="" ng-controller="studentController">
<table border="1">
   <tr>
      <th>Name</th>
      <th>Marks</th>
   </tr>
   <tr ng-repeat="student in students">
      <td>{{ student.name }}</td>
      <td>{{ student.marks }}</td>
   </tr>
</table>
</div>
<script>
function studentController($scope) {
    $scope.students = [
         {name:'Suraj',marks:89},
         {name:'Pooja',marks:81},
         {name:'Rajes',marks:69},
         {name:'Omkar',marks:61},
         {name:'Raman',marks:93},
         {name:'Amana',marks:80},
         {name:'Parth',marks:85}
      ]
}
</script>
</body>
</html>

Output :

Try it yourself

AngularJS Filters

In the previous chapter we have learnt about the AngularJS controllers and in this chapter we will be learning about AngularJS filters.

AngularJS Filters

  1. In order to transform the data used in the application we need to use filters.
  2. AngularJS filters are used to change or modify the data used in application.
  3. AngularJS filters are represented using the pipe character.
  4. AngularJS filters can be used along with the AngularJS expressions.

Below are some of the commonly used filters -

S.No.NameDescription
1uppercaseUsed to convert a text to upper case
2lowercaseUsed to convert a text to lower case
3currencyUsed to format text in a currency format.
4filterUsed to filter the array to a subset based on provided criteria.
5orderbyUsed to order an array based on provided criteria.

Examples of AngularJS filters

AngularJS filter #1 : uppercase

Filter is used to transform the textual content to uppercase format.

<!DOCTYPE html>
<html>
<head>
<script src="angular.min.js"></script>
</head>
<body>
<div ng-app="" ng-init="fname='Pritesh';lname='Taral'">
   <p>First name is {{ fname | uppercase }}</p>
   <p>Last name is  {{ lname | uppercase }}</p>
</div>
</body>
</html>

Output :

First name is PRITESH
Last name is TARAL

AngularJS filter #2 : lowercase

Filter is used to transform the textual content to lowercase format.

<!DOCTYPE html>
<html>
<head>
<script src="angular.min.js"></script>
</head>
<body>
<div ng-app="" ng-init="fname='Pritesh';lname='Taral'">
   <p>First name is {{ fname | lowercase }}</p>
   <p>Last name is  {{ lname | lowercase }}</p>
</div>
</body>
</html>

Output :

First name is pritesh
Last name is taral

AngularJS filter #3 : currency

Filter is used to transform the numeric values into currency format.

<!DOCTYPE html>
<html>
<head>
<script src="angular.min.js"></script>
</head>
<body>
<div ng-app="" ng-controller="priceController">
<p>Quantity   : <input type="number" ng-model="qty"></p>
<p>Unit Price : <input type="number" ng-model="price"></p>
<p>Total = {{ (qty * price) | currency }}</p>
</div>
<script>
function priceController($scope) {
    $scope.qty   = 5;
    $scope.price = 10;
}
</script>
</body>
</html>

Output :
currency angularjs filter

AngularJS filter #4 : orderby

<!DOCTYPE html>
<html>
<head>
<script src="angular.min.js"></script>
</head>
<body>
<div ng-app="" ng-controller="studentController">
<ul>
   <li ng-repeat="student in students | orderBy:'marks'">
      {{ student.name + ' Marks : ' + student.marks }}
   </li>
</ul>
</div>
<script>
function studentController($scope) {
    $scope.students = [
         {name:'Suraj',marks:89},
         {name:'Pooja',marks:81},
         {name:'Rajes',marks:69},
         {name:'Omkar',marks:61},
         {name:'Raman',marks:93},
         {name:'Amana',marks:80},
         {name:'Parth',marks:85}
      ]
}
</script>
</body>
</html>

Output :
AngularJS filter orderby

In this example we have created an array of the students like -

$scope.students = [
   {name:'Suraj',marks:89},
   {name:'Pooja',marks:81},
   {name:'Rajes',marks:69},
   {name:'Omkar',marks:61},
   {name:'Raman',marks:93},
   {name:'Amana',marks:80},
   {name:'Parth',marks:85}
]

In order to sort all these array elements we can use orderby filter.

<li ng-repeat="student in students | orderBy:'marks'">
    {{ student.name + ' Marks : ' + student.marks }}
</li>

AngularJS filter #5 : filter

<!DOCTYPE html>
<html>
<head>
<script src="angular.min.js"></script>
</head>
<body>
<div ng-app="" ng-controller="studentController">
<p><input type="text" ng-model="sname"></p>
<p ng-repeat="student in students | filter: sname | orderBy:'marks'">
  {{ student.name + ' Marks : ' + student.marks }}
</p>
</div>
<script>
function studentController($scope) {
    $scope.students = [
         {name:'Suraj',marks:89},
         {name:'Pooja',marks:81},
         {name:'Rajes',marks:69},
         {name:'Omkar',marks:61},
         {name:'Raman',marks:93},
         {name:'Amana',marks:80},
         {name:'Parth',marks:85}
      ]
}
</script>
</body>
</html>

Output :
AngularJS Filter filters

AngularJS controllers

In the previous chapters we have learnt about the AngularJS expressions and AngularJS directives. In this chapter we will be learning about the controllers in AngularJS

AngularJS Controllers Basics:

  1. ng-controller directive is used to define the controller in AngularJS.
  2. AngularJS controllers are used to control the flow of data in application.
  3. AngularJS controller is a JavaScript object having attributes and functions.
  4. AngularJS controller accepts $scope as a parameter.
  5. $scope parameter is used to refer the application or module controlled by controller.

Syntax of controller

We have declared a controller using the ng-controller directive

<div ng-app="" ng-controller="exampleContoller">
...
</div>

Definition of controller is written inside the script code block as shown below -

<script>
function exampleContoller($scope) {
      $scope.str1 = "123",
      $scope.str2 = "ABC",
      $scope.concatString = function() {
         return $scope.str1 + " " + $scope.str2;
      }
}
</script>

Explanation

In the above definition of AngularJS controller we have written following things -

  1. We have defined the AngularJS application using ng-app directive.
  2. Our AngularJS application runs inside a div tag.
  3. ng-controller directive is used for naming the AngularJS controller object.
  4. AngularJS controller is nothing but a standard JavaScript object constructor having same name as that of controller. i.e exampleContoller
  5. AngularJS will invoke exampleContoller function with a $scope object as parameter
  6. $scope is the application object which is an owner of application variables and functions

In this case we have created two application level properties and one application level method

EntityExplanation
str1Application level property
str2Application level property
concatStringApplication level method
$scopeApplication level object

Example

Example #1 : AngularJS controller

<!DOCTYPE html>
<html>
<head>
<script src="angular.min.js"></script>
</head>
<body>
<div ng-app="" ng-controller="exampleContoller">
  <p>Enter String 1 : <input type="text" ng-model="str1"></p>
  <p>Enter String 2 : <input type="text" ng-model="str2"></p>
</div>
<script>
function exampleContoller($scope) {
      $scope.str1 = "123",
      $scope.str2 = "ABC"
}
</script>
</body>
</html>

Output :
angularjs controller example 1

Example #2 : AngularJS controller (Method)

<!DOCTYPE html>
<html>
<head>
<script src="angular.min.js"></script>
</head>
<body>
<div ng-app="" ng-controller="exampleContoller">
<p>Enter String 1 : <input type="text" ng-model="str1"></p>
<p>Enter String 2 : <input type="text" ng-model="str2"></p>
<p>Result String : {{concatString()}}</p>
</div>
<script>
function exampleContoller($scope) {
      $scope.str1 = "123",
      $scope.str2 = "ABC",
      $scope.concatString = function() {
         return $scope.str1 + " " + $scope.str2;
      }
}
</script>
</body>
</html>

Output :
angularjs controller example 2

Example #3 : AngularJS controller (JSON Object)

<!DOCTYPE html>
<html>
<head>
<script src="angular.min.js"></script>
</head>
<body>
<div ng-app="" ng-controller="exampleContoller">
<p>Enter String 1 : <input type="text" ng-model="svar.str1"></p>
<p>Enter String 2 : <input type="text" ng-model="svar.str2"></p>
<p>Result String : {{svar.concatString()}}</p>
</div>
<script>
function exampleContoller($scope) {
   $scope.svar = {
      str1: "123",
      str2: "ABC",
      concatString : function() {
         var iObj;
         iObj = $scope.svar;
         return iObj.str1 + " " + iObj.str2;
      }
   };
}
</script>
</body>
</html>

Output :
angularjs controller example 2
Consider the below code for AngularJS controller -

function exampleContoller($scope) {
   $scope.svar = {
      str1: "123",
      str2: "ABC",
      concatString : function() {
         var iObj;
         iObj = $scope.svar;
         return iObj.str1 + " " + iObj.str2;
      }
   };
}

In this case we have defined an application level json object i.e svar, This application level object is again having the attributes and methods.

str1,str2 are attributes of json object while concatString is an method of json object

AngularJS directives

In the previous chapter we have already seen basics of AngularJS and expressions used in AngularJS. This tutorial explains the AngularJS directives in simple and easy way

AngularJS Directives

AngularJS directives are used for extending HTML elements. AngularJS directives usually starts with ng- prefix.

Below is the list of few AngularJS directives -

DirectiveExplanation
ng-appDirective used to start an AngularJS Application
ng-initDirective used to initialize application data
ng-modelDirective used to define a model (i.e variable to be used in AngularJS application)
ng-repeatDirective used to repeat html elements

Examples

AngularJS Directives #1 : ng-app

  1. In each AngularJS application ng-app directive is root element.
  2. ng-app directive is initialized automatically when a web page is loaded.
  3. ng-app directive is used to start an AngularJS application
  4. ng-app directive is used to load various AngularJS modules in an application

Consider the below example -

<body ng-app="">
...
</body>

In this case we have defined a default AngularJS application using ng-app attribute of a body element.

Meaning of above code snippet is that we can include AngularJS syntax anywhere inside the body tag.

<div ng-app="">
...
</div>

We can even define the default AngularJS application inside the div element. In the above example our AngularJS syntax can be recognized inside div element only.

AngularJS Directives #2 : ng-init

In order to initialized the data used inside the AngularJS application ng-init directive is used. Variables used inside AngularJS application are pre-initialized befoe execution of AngularJS application.

Recommanded Article : Initializing values inside AngularJS application

<div  ng-app="" ng-init="student = [{subject:'MAT',marks:'78'},
                                    {subject:'ENT',marks:'98'},
                                    {subject:'HND',marks:'90'}]">
</div>

In the above example, we have initialized an array of students using JSON array

AngularJS Directives #3 : ng-model

Variables or models used in the AngularJS application are defined using ng-model directive. In below example we have we have defined a model named fname & lname.

<div ng-app="">
  <p>Enter first Name: <input type="text" ng-model="fname"></p>
  <p>Enter last  Name: <input type="text" ng-model="lname"></p>
</div>

Example of ng-model directive

<!DOCTYPE html>
<html>
<head>
<script src="angular.min.js"></script>
</head>
<body>
<div  ng-app="">
  <p>Enter first Name: <input type="text" ng-model="fname"></p>
  <p>Enter last  Name: <input type="text" ng-model="lname"></p>
  <hr />
  <p>Youu first name : <span ng-bind="fname"></span></p>
  <p>Youu first name : <span ng-bind="lname"></span></p>
</div>
</body>
</html>

AngularJS Bind Expression

AngularJS Directives #4 : ng-repeat

ng-repeat directive repeats html elements for each item in a collection. In below example, we have iterated over array of students.

<!DOCTYPE html>
<html>
<head>
<script src="angular.min.js"></script>
</head>
<body>
<div  ng-app="" ng-init="students = [{subject:'MAT',marks:'78'},
                           {subject:'ENT',marks:'98'},
                           {subject:'HND',marks:'90'}]">
   <div id="container">
      <div class="list" ng-repeat="student in students">
         <p>Name of  subject : {{ student.subject }}</p>
         <p>Marks in subject : {{ student.marks }}</p>
      </div>
   </div>                     
</div>
</body>
</html>

Output :

Name of subject : MAT
Marks in subject : 78
Name of subject : ENT
Marks in subject : 98
Name of subject : HND
Marks in subject : 90